Saturday 30 August 2014

Solution Of getting Error When Re-create the Apache Tomcate Servere In Eclipse (Any Version)

Hello Friends,
This is checked with Eclipse Juno Version on Windows 7 OS, With Apache Tomcate 7 version.

When you create a server first time it will done with normal steps.
But for some reason we need to delete the server. Mostally we delete from Server tab in eclipse by right click on server and click on delete.
At this time the server is deleted from server tab, but not permanently delete from workspace.
Because of that when we re-create the server with same version we don't able to click on next button after selecting the server version.

So here is the complete guide with screen shot, How to solve this type of issue.

The issue is :

The next button is not enable when we re-create the server.

STEP 1 :

 
Go to : Window -> Preferences

You get the above screen.  Then after select Server option from right panel and click on Runtime Environments as per screen shot.

STEP 2 :

Now click on list of server and delete all the server to clean the workspace. As per above screen shot.

When all is done click on OK.

STEP 3 :


Now as per normal way add server from Server tab from Eclipse.

Now as we saw in screen the next button is enable and we can add new server.

STEP 4 :


Now at last select folder where the Tomcat is reside and click on OK and Finish.

All is done the server is create now.

ENJOY THE JAVA WITH CUP OF TEA


Saturday 2 August 2014

Passing JSP Values In Servlet

Hello Friends
This is simple example of Passing JSP page values to Servlet.

This is simple JSP Form :

CODE :
------------
SimpleForm.jsp

<body>
    <form action="SimpleServletPath">
        <table align="center" border="1">
            <tr>
                <td align="right">User Name :</td>
                <td><input type="text" name="userName"></td>
            </tr>
            <tr>
                <td align="right">Password :  </td>
                <td><input type="password" name="password"></td>
            </tr>
            <tr>
                <td align="right">Gender :  </td>
                <td><input type="radio" name="gender" value="Male">Male</input>
                    <input type="radio" name="gender" value="Female">Female</input></td>
            </tr>
            <tr>
                <td align="right">City :  </td>
                <td><select name="city">
                        <option value="Ahmedabad">Ahmedabad</option>
                        <option value="Pune">Pune</option>
                        <option value="Chhenai">Chennai</option>
                </select></td>
            </tr>
            <tr>
                <td align="right">Technology :  </td>
                <td><select name="technology" multiple="multiple" size="3">
                        <option value="Java">Java</option>
                        <option value="DOTNet">.Net</option>
                        <option value="Androd">Androd</option>
                        <option value="iphone">iPhone</option>
                        <option value="PHP">PHP</option>
                        <option value="Linux">Linux</option>
                </select></td>
            </tr>
            <tr>
            <td colspan="2" align="center"><input type="submit" value="Click To Submit"> </td>
            </tr>
        </table>

    </form>


SERVLET :

response.setContentType("text/html");

        String userName = request.getParameter("userName");
        String password = request.getParameter("password");
        String gender = request.getParameter("gender");
        String city = request.getParameter("city");
        String[] technology = request.getParameterValues("technology");

        PrintWriter out = response.getWriter();
        out.println("<h3> Welcome " + userName + "</h3><br>");
        out.println("Your password is : " + password+"<br>");
        out.println("You are : " + gender+"<br>");
        out.println("You are from : " + city+"<br>");
        out.print("You are expert in : ");
        for (int i = 0; i < technology.length; i++) {
            out.print(technology[i]+" , ");
        }

XML Mapping :

<servlet>
    <description></description>
    <display-name>SimpleServlet</display-name>
    <servlet-name>SimpleServlet</servlet-name>
    <servlet-class>edu.anand.servlet.SimpleServlet</servlet-class>
  </servlet>
  <servlet-mapping>
    <servlet-name>SimpleServlet</servlet-name>
    <url-pattern>/SimpleServletPath</url-pattern>
  </servlet-mapping>


Tuesday 22 July 2014

Oracle Database Connectivity Practical Using JSP-Servlet


                    THIS IS A DATABASE CONNECTIVITY PRACTICAL USING JSP-SERVLET


First of all look at the JSP design of this demo.
1) First page to connect to database.


This is a screen where database connection parameter are required to enter.

  2) Second page to view user of the database.


Let's start the code here.

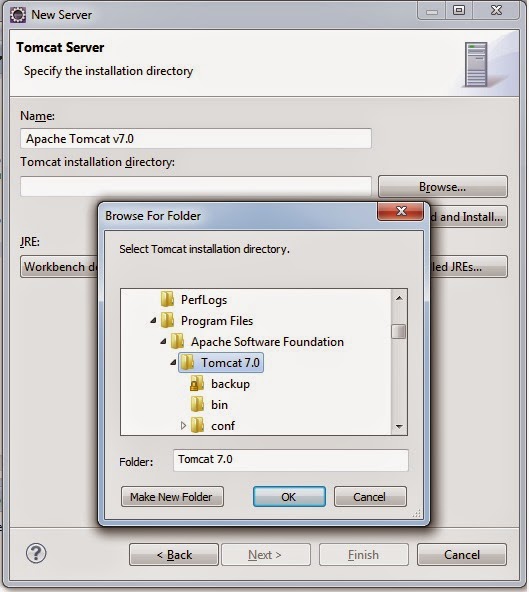
I am using eclipse IDE, Apache Tomcate for this demo.

I assume that you are not new to java, So i am not showing the basic common thing for creating dynamic web-project using eclipse and this thing.

STEP-1 : Get  Required .jar Files.
We required jar file for database connection and also for using jstl tags. So required jar files are 
- ojdbc14.jar
- jstl-1.2.jar

STEP-2 : Place required jar file in lib folder of the project. And also create user-library and add this two jar in this library.

STEP-3 : Create First JSP Pages And servlets.
 Design the page as per image above or you can make your own design.

HERE IS THE SPAN-SHOT OF THE CODE. 
YOU CAN DOWNLOAD SOURCE FILE FROM LINK AT LAST OF THIS POST.

DBConnectionDemo.jsp

----------------------------
callServlet() function placed in JavaScript code that is called when user click on button.

  
-----------------------------
Servlet Code : ConnectToDatabase.java
 
public static HttpSession session = null;

    protected void doGet(HttpServletRequest request,
            HttpServletResponse response) throws ServletException, IOException {
        session = request.getSession(true);

        if (session != null) {
            System.out.println("Cleare the session when new request get.");
            session = request.getSession(false);
            session.invalidate();
            ConnUtil.conn = null;
        }

        session = request.getSession();

        session.setAttribute("hostName", request.getParameter("txtHostName"));
        session.setAttribute("portNumber",
                request.getParameter("txtPortNumber"));
        session.setAttribute("sid", request.getParameter("txtSID"));
        session.setAttribute("userName", request.getParameter("txtUserName"));
        session.setAttribute("password", request.getParameter("txtPassword"));
        session.setAttribute("connString",
                "jdbc:oracle:thin:@" + request.getParameter("txtHostName")
                        + ":" + request.getParameter("txtPortNumber") + ":"
                        + request.getParameter("txtSID"));

        System.out.println("Password is : " + session.getAttribute("password"));

        ConnUtil connUtil = new ConnUtil();
        if (ConnUtil.conn == null) {
            connUtil.setConnection();
        }

        ResultSet rs = null;
        String query = "SELECT username FROM sys.dba_users WHERE account_status = 'OPEN'";
        String errorMessage = null;

        try {
            rs = connUtil.getResultSet(query);
            ArrayList<String> userList = new ArrayList<String>();

            while (rs.next()) {
                System.out.println(rs.getString(1));
                userList.add(rs.getString(1));
            }

            session.setAttribute("schemaNameList", userList);
            request.setAttribute("sendUserList", userList);

        } catch (SQLException se) {
            errorMessage = se.getMessage();
        } catch (Exception e) {
            errorMessage = e.getMessage();
        } finally {
            System.out.println("Error Message : " + errorMessage);
            if (errorMessage == null) {
                request.getRequestDispatcher("/ListOfUser.jsp").forward(
                        request, response);
            } else {
                request.setAttribute("errMsg", errorMessage);
                request.getRequestDispatcher("/DatabaseConnectionPage.jsp")
                        .forward(request, response);
            }
        }
    }

-----------------------
ConnUtil.java


--------------------------
Second Page Code : ListOfUser.jsp


-------------------------
Servlet Mapping Code : web.xml


 CLICK HERE TO DOWNLOAD RESOURCE OF THIS DEMO.

* The download contain two jar file jsp and java (servlet) file and web.xml mapping file.
* This demo is for educational purpose only, and developed by person use.
* If any issue please contact me on my mail id : " codeofjava.blog@gmail.com "

Saturday 19 July 2014

HELLO FRIENDS,
THIS IS THE DEMO OF RETRIEVING VALUE/TEXT OF SELECT OPTION FROM JSP PAGE USING JAVA SCRIPT.

THIS IS JSP CODE :
-----------------------
 <body>
    <table align="center">
        <tr>
            <td><select id="idSelectOption" onchange='funGetSelectOptionValue()'>
                    <option value="0">-- SELECT --</option>
                    <option value="1">ONE</option>
                    <option value="2">TWO</option>
                    <option value="3">THREE</option>
            </select></td>
        </tr>
    </table>
</body>


THIS IS JAVASCRIPT CODE :
----------------------------------
<script type="text/javascript">
function funGetSelectOptionValue(){
   
    var obj = document.getElementById("idSelectOption");
    var val = obj.options[obj.selectedIndex].value;
    var text = obj.options[obj.selectedIndex].text;
   
    alert("SELECTED INDEX IS : "+ val);
    alert("SELECTED TEXT IS : "+ text);
   
}


HERE IS THE FULL CODE EXAMPLE OF ABOVE DEMO